Important
This code must not be used for production use as is. This sample is developed only to educate the users in using some of the features of the AWS in developing Serverless ETL for Redshift
Beginners - Serverless ETL for Amazon Redshift
Overview
This blog post is the first (Beginners Level) postof Serverless ETL for Amazon Redshift series.
- Beginners - Serverless ETL for Amazon Redshift
- Intermediate - Serverless ETL for Amazon Redshift
- Advance - Serverless ETL for Amazon Redshift (Coming Soon)
This blog post is to help Data Warehousing professionals who are starting learning AWS Services and intrested in basic serverless architecture for ETL/ELT process.
This post is to show very basic level (100 level) of automation without ETL metadata management and tracking etc. Our next post (Intermediate and Advance) will have details and best practices around Serverless ETL/ELT architecture and step and step guid along with code samples.
Services Used
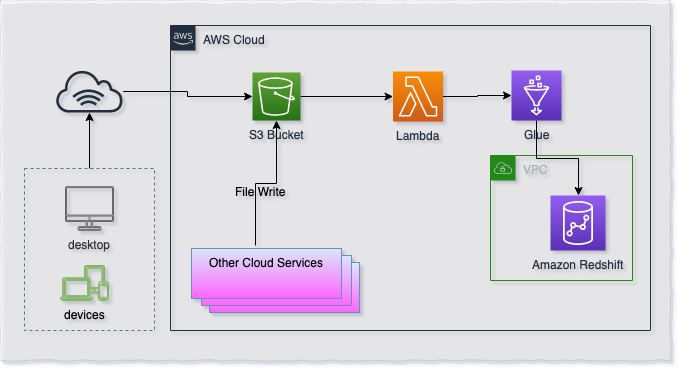
Architecture
Assumptions and Basic Setup
Following are assumption and Basic Setup
- Amazon Redshift cluster is already setup (see Launch a Sample Amazon Redshift Cluster)
- S3 Structure setup is
BucketName -> Redshift Schema Name -> Table Name -> Data File(s)You can change the Lambda logic and functionality based on your S3 structure
Setup Amazon Redshift User, Schema and Table
-- CREATE Group and User
CREATE GROUP grp_rsloader;
CREATE USER rsloader_user PASSWORD 'TechsBoot_2019' IN GROUP grp_rs_loader;

-- Create Schema
CREATE SCHEMA IF NOT EXISTS rsloader;
-- Setup Access Rights on Schema for Group
ALTER DEFAULT PRIVILEGES IN SCHEMA rsloader
      GRANT ALL ON TABLES TO GROUP grp_rs_loader;
GRANT ALL ON SCHEMA  rsloader TO GROUP grp_rs_loader;
GRANT ALL ON ALL TABLES IN  SCHEMA rsloader TO
      GROUP grp_rs_loader;
-- Create Table
CREATE TABLE IF NOT EXISTS rsloader.lineitem
(
    l_orderkey INTEGER NOT NULL
    ,l_partkey INTEGER NOT NULL  ENCODE lzo
    ,l_suppkey INTEGER NOT NULL  ENCODE lzo
    ,l_linenumber INTEGER NOT NULL  ENCODE lzo
    ,l_quantity NUMERIC(15,2) NOT NULL  ENCODE lzo
    ,l_extendedprice NUMERIC(15,2) NOT NULL  ENCODE lzo
    ,l_discount NUMERIC(15,2) NOT NULL  ENCODE lzo
    ,l_tax NUMERIC(15,2) NOT NULL  ENCODE lzo
    ,l_returnflag VARCHAR(1) NOT NULL  ENCODE lzo
    ,l_linestatus VARCHAR(1) NOT NULL  ENCODE lzo
    ,l_shipdate DATE NOT NULL  ENCODE lzo
    ,l_commitdate DATE NOT NULL  ENCODE lzo
    ,l_receiptdate DATE NOT NULL  ENCODE lzo
    ,l_shipinstruct VARCHAR(25) NOT NULL  ENCODE lzo
    ,l_shipmode VARCHAR(10) NOT NULL  ENCODE lzo
    ,l_comment VARCHAR(44) NOT NULL  ENCODE lzo
)
DISTSTYLE KEY
DISTKEY (l_orderkey)
SORTKEY (
    l_orderkey
    )
;
Setup S3 bucket and hierarchy
- Create S3 Bucket (we will use
techsboot_rsloaderS3 bucket name in our examples) - Create folder
rsloaderin S3 Bucket - Create a subfolder
lineiteminrsloaderfolder - S3 structure will look like
 techsboot_rsloader (or your bucket name)
    |__ rsloader
        |__ lineitem
Create IAM Role for AWS Glue
- Go to https://console.aws.amazon.com/iam
- Click Roles in left panel and click Create role button
- Select AWS services in type of trusted entity and Select/Click Glue as the service that will use this role
- Click Next: Permissions button at the bottom
- Select AWSGlueServiceRole Policy from the list and click Next: Tags
- Provide Tags’ Key-Values if you want and click Next: Review
- Enter Role Name and Description and click Create role
Create IAM Role for AWS Lambda
- Go to https://console.aws.amazon.com/iam
- Click Roles in left panel and click Create role button
- Select AWS services in type of trusted entity and Select/Click Lambda as the service that will use this role
- Click Next: Permissions button at the bottom
- Select AWSLambdaFullAccess Policy from the list and click Next: Tags
- Provide Tags’ Key-Values if you want and click Next: Review
- Enter Role Name and Description and click Create role
Create AWS Glue Job
- Go to https://console.aws.amazon.com/glue
- Click on Jobs in left panel and click on Add job button on main panel
- Enter Name
glu_techsboot_rsloader - Select IAM Role from list which was created in previous step
- Select
Python shellin Type - Select
A new script to be authored by youin This job runs section - Enter Script file name
- Select appropriate S3 path to store glue script in S3 path where the script is stored section
- Expand Security configuration, script libraries, and job parameters (optional) section
- In Python library path text box, enter
s3://techsboot/py-ref/pg8000.egg - Set Max concurrency to
10to handel 10 file uploads at the same time. Or you can set this number based on your implementation needs. - Click Next
- Click Save job and edit script
- Copy and Paste following python custom code and Glue script editor
see Adding Python Shell Jobs in AWS Glue for detailed step by step job creation guid. - Replace correct values for all variables enclosed in < > within the script.
import os
import sys
import boto3
import json
from awsglue.utils import getResolvedOptions

import pg8000

## @params: [JOB_NAME]
args = getResolvedOptions(sys.argv, ['JOB_NAME', 'schema_name', 'table_name', 's3_file'])
schema_name = args['schema_name']
table_name = args['table_name']
s3_file = args['s3_file']
#
REDSHIFT_DATABASE = "<Your_Redshift_Database>"
REDSHIFT_USER = "rsloader_user"
REDSHIFT_PASSWD = "TechsBoot_2019"
REDSHIFT_PORT = <Your_Redshift_Cluster_Port>
REDSHIFT_ENDPOINT = "<Your_Redshift_EndPoint>"
if not schema_name:
  REDSHIFT_SCHEMA = 'public'
else:
  REDSHIFT_SCHEMA = schema_name
REDSHIFT_TABLE  = table_name
IAM_ROLE  = "arn:aws:iam::<aws_account_number>:role/<Your_Redshift_IAM_Role>"

REDSHIFT_COPY_STATEMENT = """copy {}.{}
          FROM  '{}'
          iam_role '{}'
          TIMEFORMAT AS 'MM/DD/YY HH:MI'
          ; """.format(REDSHIFT_SCHEMA, REDSHIFT_TABLE, s3_file, IAM_ROLE)

try:
    conn = pg8000.connect(
        database=REDSHIFT_DATABASE,
        user=REDSHIFT_USER,
        password=REDSHIFT_PASSWD,
        host=REDSHIFT_ENDPOINT,
        port=REDSHIFT_PORT
    )
except Exception as ERROR:
  print("Connection Issue: " + str(ERROR))
  sys.exit(1)

try:
  cursor = conn.cursor()
  # print(REDSHIFT_COPY_STATEMENT)
  cursor.execute(REDSHIFT_COPY_STATEMENT)
  # result = cursor.fetchone()
  cursor.close()
  conn.commit()
  conn.close()
except Exception as ERROR:
  print("Execution Issue: " + str(ERROR))
  sys.exit(1)
Create AWS Lambda Function
- Go to https://console.aws.amazon.com/lambda
- Click Create function
- Select Author from scratch
- Enter
techsboot-rsloader-lambdain Function name - Select
Python 3.7in Runtime - In Permissions section, select
Use an existing roleand then select the role you create in previous step - Click Create function button at the bottom
- Copy and Paste following lambda python code in code editor
- Click Save button
- Expand Designer section in the same window (section above to
Function code) - Click Add trigger button
- Select S3 in Trigger configuration
- Select the S3 Bucket you created in previous step
- Click Add
from datetime import datetime, timedelta
import json
import boto3
client = boto3.client('glue')
#
def lambda_handler(event, context):
    for record in event['Records']:
        # Getting S3 Bucket Name from event record
        bucket = record['s3']['bucket']['name']
        # Getting S3 Key from event record
        key = record['s3']['object']['key']
        # Generating complete S3 file path to pass to Glue Job
        fullS3Path = "s3://" + bucket + "/" + key
        # Splitting S3 Key into Schema Name, Table Name and File Name
        tmp_key = key.split('/',2)
        schema_name = tmp_key[0]
        table_name = tmp_key[1]
        filename = tmp_key[2]
        glue_job_name = "glu_techsboot_rsloader"
        fullS3Message = "This Lambda is triggered by - s3://" + bucket + "/" + key
        # Printing Debugging Message
        print (fullS3Message)
        print ("fullS3Path = " + fullS3Path)
        print ("Bucket = " + bucket)
        print ("Key = " + key)
        print ("schema_name = " + schema_name)
        print ("table_name = " + table_name)
        print ("filename = " + filename)
        # Triggering Glue Job
        print ("Triggering Job = " + glue_job_name)
        response = client.start_job_run(
            JobName = glue_job_name,
            Arguments = {
                '--schema_name':   schema_name,
                '--table_name':  table_name,
                '--s3_file':  fullS3Path } )
        # Converting "response" from Type dict to string
        string_response = json.dumps(response)
        # Parsing JSON response from Glue API
        parsed_response = json.loads(string_response)
        # Printing Job Metadata in Cloudwatch Log
        print("    JOB Metadata           ")
        print("~~~~~~~~~~~~~~~~~~~~~~~~~~~~~~~~~~~~~~~~~~~~~~~~~~~~~~~~~~~~~~~~~~")
        print("    --> JobRunID          = " + parsed_response['JobRunId'])
        print("    --> RequestID         = " + parsed_response['ResponseMetadata']['RequestId'])
        print("    --> HTTPStatusCode    = " + str(parsed_response['ResponseMetadata']['HTTPStatusCode']))
        print("    --> Timestamp GMT     = " + parsed_response['ResponseMetadata']['HTTPHeaders']['date'])
        print("    --> content-type      = " + parsed_response['ResponseMetadata']['HTTPHeaders']['content-type'])
        print("    --> content-length    = " + parsed_response['ResponseMetadata']['HTTPHeaders']['content-length'])
        print("    --> connection        = " + parsed_response['ResponseMetadata']['HTTPHeaders']['connection'])
        print("    --> x-amzn-requestid  = " + parsed_response['ResponseMetadata']['HTTPHeaders']['x-amzn-requestid'])
        print("    --> RetryAttempts     = " + str(parsed_response['ResponseMetadata']['RetryAttempts']))
        print("~~~~~~~~~~~~~~~~~~~~~~~~~~~~~~~~~~~~~~~~~~~~~~~~~~~~~~~~~~~~~~~~~~")
        print(response)
        print("~~~~~~~~~~~~~~~~~~~~~~~~~~~~~~~~~~~~~~~~~~~~~~~~~~~~~~~~~~~~~~~~~~")
Pre-load testing
- Connect to Redshift cluster using SQL Client (i.e. SQLWorkbench or DBeaver)
-
Run following SQL, result of this SQL should be
zero (0).sql SELECT COUNT(*) FROM rsloader.lineitem WHERE l_linestatus in ('C', 'R');
Upload sample data into S3
- Download sample data (2 files) from following links
- Go to https://console.aws.amazon.com/s3/
- Click on bucket you created in previous step
- Click on
rsloaderfolder - Click on
lineitemsubfolder - Click on Upload button
- Click Add on displayed window
- In file selection dialog, select files you downloaded on step 1
- Click Next, and then Next, and then again Next (by keeping next 2 steps of displayed windows as default)
- Click Upload
Verify data in Amazon Redshift
- Connect to Redshift cluster using SQL Client (i.e. SQLWorkbench or DBeaver)
- Run following SQL
    SELECT COUNT(*)
    FROM rsloader.lineitem
    WHERE l_linestatus in ('C', 'R');
- Result should be like below table
| l_linestatus | count |
|---|---|
| R | 200 |
| C | 200 |